Introduction to Easy DIY Christmas Cards
The charm of handcrafted Christmas cards lies in their unique ability to convey heartfelt sentiments in a tangible and personal way. Unlike mass-produced cards, DIY creations offer a delightful blend of creativity and personal touch, making them cherished keepsakes for both the sender and the recipient. The process itself can be incredibly therapeutic and rewarding, offering a welcome respite from the holiday rush.The appeal of crafting easy DIY Christmas cards extends beyond mere aesthetics.
It’s a chance to express individual style and create something truly one-of-a-kind, reflecting the sender’s personality and relationship with the recipient. The act of making the card becomes an integral part of the gift-giving experience, adding an extra layer of meaning and thoughtfulness.
Reasons for Choosing DIY over Store-Bought Cards
Choosing to create your own Christmas cards instead of purchasing pre-made ones offers several compelling advantages. This decision often stems from a desire for greater personalization and a more meaningful expression of holiday cheer.
- Uniqueness and Personalization: Store-bought cards, while convenient, often lack the unique touch that a handmade card provides. DIY cards allow for complete customization, reflecting the sender’s personal style and the recipient’s individual preferences.
- Cost-Effectiveness: While initial investment in crafting supplies might be necessary, creating your own cards can ultimately prove more cost-effective, especially when sending a large number of cards. This is particularly true when considering the cost of high-quality, uniquely designed store-bought options.
- Creative Expression: Making DIY Christmas cards offers a fulfilling creative outlet. It allows individuals to explore their artistic talents and personalize their cards with unique designs, embellishments, and messages.
Benefits of Personalized Christmas Cards
Personalized Christmas cards offer a range of benefits that extend beyond the simple act of sending holiday greetings. They strengthen relationships, create lasting memories, and express sentiments in a deeply meaningful way.
- Strengthened Relationships: The time and effort invested in creating a personalized card demonstrates care and consideration, strengthening bonds with family and friends. The recipient feels valued and appreciated, knowing that the sender took the time to craft something special just for them.
- Memorable Keepsakes: Handmade cards are often treasured as keepsakes, serving as tangible reminders of the holiday season and the sender’s thoughtfulness. These cards become cherished mementos, adding a personal touch to holiday memories.
- Enhanced Emotional Connection: The act of creating and sending a personalized card fosters a deeper emotional connection between the sender and recipient. It allows for a more intimate and heartfelt expression of holiday wishes.
- Unique and Unforgettable Greetings: Personalized cards stand out from the generic store-bought variety, making them more memorable and impactful. They leave a lasting impression, demonstrating a level of care and attention that generic cards simply cannot match.
- Reflection of Personal Style: DIY cards offer a unique opportunity to showcase the sender’s personality and artistic style. This personal touch adds a distinct charm and character, making each card a true reflection of the sender’s individuality.
Techniques for Easy Card Making

Creating stunning Christmas cards doesn’t require advanced crafting skills. With a few simple techniques and readily available materials, you can produce personalized and festive cards that will impress your loved ones. This section explores three easy-to-master techniques: layered card design, stenciling, and rubber stamping.
Layered Card Design
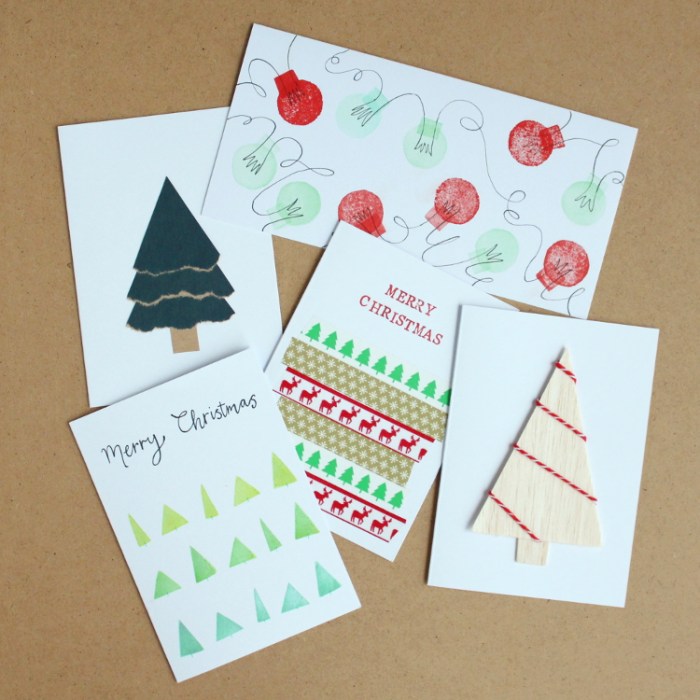
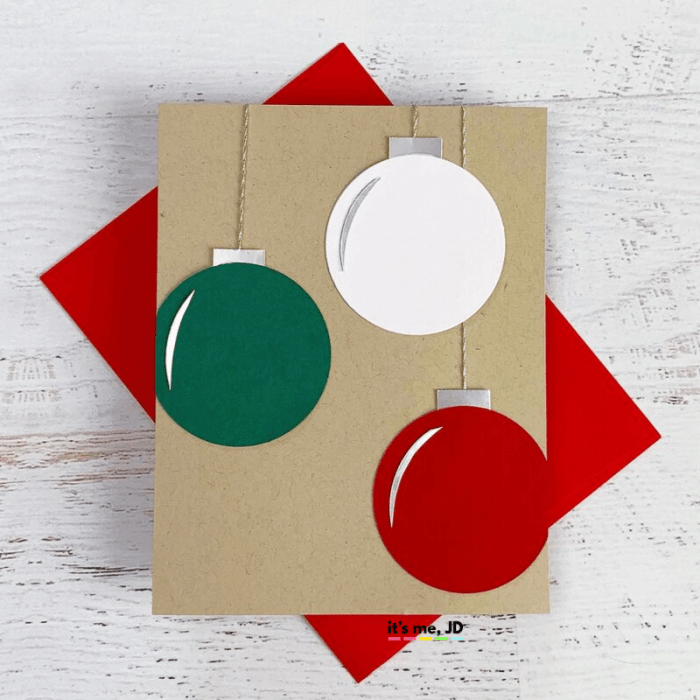
Layered card designs add depth and visual interest to your creations. This technique involves layering different shapes, colors, and textures of paper or cardstock to create a three-dimensional effect. Begin by selecting your base cardstock, which will form the foundation of your card. Then, choose coordinating papers or cardstock in various colors and patterns. Cut out shapes—hearts, stars, snowflakes, or even simple rectangles—from these papers.
Experiment with different sizes and shapes to create visual harmony. Arrange the cut-outs on your base cardstock, playing with their placement and overlap. Once you’re satisfied with the arrangement, adhere the shapes using strong adhesive. Consider adding embellishments like glitter, ribbon, or small decorative elements to further enhance the design. For example, a simple layered card could involve a red base card, layered with a smaller green rectangle, topped with a white snowflake cut-out.
Stenciling Patterns on Cards
Stencils provide a simple yet effective way to add intricate patterns to your Christmas cards without the need for advanced drawing skills. Choose a stencil with a festive design, such as snowflakes, Christmas trees, or stars. Secure the stencil firmly onto your card using painter’s tape to prevent it from moving. Using a sponge dauber or a fine-tipped paintbrush, apply paint or ink onto the stencil’s openings.
Work in small sections to ensure even coverage and avoid smudging. Once the paint is dry, carefully remove the stencil. Repeat the process with different colors or stencils to create a layered effect. For instance, you could use a snowflake stencil with white paint, followed by a slightly smaller star stencil with gold paint, creating a layered winter scene.
Using Rubber Stamps to Add Festive Images
Rubber stamps offer a quick and easy way to add festive images and sentiments to your cards. Choose stamps with Christmas-themed designs, such as Santa Claus, reindeer, or Christmas trees. Select ink pads in coordinating colors. Position the stamp on your card and firmly press down to transfer the image. For crisp, clean impressions, use even pressure and avoid tilting the stamp.
Experiment with layering different stamps or using multiple colors to create more complex designs. A simple example would be stamping a Christmas tree in green ink, followed by a smaller star stamp in gold ink on top of the tree. Adding a sentiment stamp such as “Merry Christmas” completes the design.
Adding Personal Touches
Adding a personal touch transforms a simple Christmas card into a cherished keepsake. It shows the recipient that you’ve put thought and effort into your greeting, making it far more meaningful than a generic store-bought card. This personal touch can be achieved through thoughtful messaging, elegant handwriting, or the inclusion of meaningful photographs.
Crafting delightful Christmas cards is a simple pleasure, a testament to heartfelt wishes. For a more rustic touch, consider complementing your handmade cards with charming ornaments, perhaps incorporating elements inspired by the beautiful diy wood christmas decorations you can find online. These wooden accents offer a unique, handcrafted feel, perfectly enhancing the personal touch of your easy DIY Christmas cards.
Let’s explore several ways to inject your unique personality and sentiments into your DIY Christmas cards.
Personalized Message Ideas
Choosing the right words is crucial for conveying your genuine feelings. A generic “Merry Christmas” is fine, but a personalized message adds a layer of warmth and connection. Consider the recipient’s personality and your relationship when selecting a message.
- Share a specific happy memory you share with the recipient: “Remember that hilarious snowball fight we had last year? Wishing you a Christmas filled with similar joyful moments!”
- Express gratitude for their presence in your life: “Thank you for being such a wonderful friend/family member. Wishing you a Merry Christmas filled with love and laughter.”
- Offer a hopeful message for the new year: “Hoping this Christmas brings you peace and joy, and that the new year brings you even more happiness.”
- Mention a shared inside joke or reference: “Wishing you a Merry Christmas – may your eggnog be strong and your presents plentiful (just like last year!).”
- Simply express your love and affection: “Sending you all my love and warmest wishes this Christmas. Merry Christmas!”
Incorporating Handwritten Calligraphy or Lettering
Handwritten calligraphy or lettering elevates the overall aesthetic of your card and adds a unique, personal touch. Even if your handwriting isn’t perfect, the effort shows. Consider using a calligraphy pen or a fine-tipped marker for a more refined look.
Practice your lettering on scrap paper before writing on the card itself. Experiment with different fonts and styles to find one that suits your card’s design and your personal style. You can also find numerous online tutorials and resources to help you improve your calligraphy skills.
Personalizing Cards Using Photographs
Including a photograph is a powerful way to personalize your Christmas cards, particularly for loved ones you may not see often. The photo should be high-quality and relevant to your relationship with the recipient. Consider the overall aesthetic of your card design when choosing the photograph.
You can incorporate photos in various ways: a single, prominent photo; a collage of smaller pictures; or even a subtle, partially visible photo as a background element. Ensure the photo complements your card’s design and doesn’t overpower other elements. Avoid using overly edited or filtered photos; a natural, candid shot often works best.
Packaging and Presentation

Presenting your handmade Christmas cards thoughtfully enhances their value and adds a personal touch. The way you package your cards can be as creative and festive as the cards themselves, leaving a lasting impression on the recipient. Consider the occasion and your relationship with the recipient when choosing a packaging method.
Choosing the right packaging protects your cards during transit and elevates the overall gifting experience. Below are three distinct options to consider.
Packaging Options for Christmas Cards, Easy diy christmas cards
Several options exist for packaging your beautifully crafted Christmas cards, ranging from simple to more elaborate presentations.
- Clear Cellophane Bags: These offer a simple yet elegant way to protect your cards. A clear bag allows the recipient to see the card design immediately, creating visual appeal. You can add a festive ribbon or sticker for an extra touch.
- Small Gift Boxes: For a more luxurious feel, consider using small gift boxes. These can be purchased pre-made or crafted from cardstock. The box provides excellent protection and allows for the inclusion of small extra gifts, such as a candy cane or a miniature ornament.
- Handmade Paper Envelopes: Creating custom envelopes from decorative paper allows for complete design control and personalization. Matching the envelope design to the card creates a cohesive and professional look.
Creating Simple Card Envelopes from Decorative Paper
Making your own envelopes is a surprisingly simple process that adds a significant touch of personalization. The process involves carefully measuring and cutting the decorative paper to the correct size, then folding and adhering the edges to form the envelope.
Imagine using a richly textured red paper with gold foil accents. Cut a square of paper, perhaps 6×6 inches, depending on your card size. Score lightly along the lines where you’ll fold. Fold two opposite corners to meet in the center, creating a triangle. Then fold the bottom edge up to the top point of the triangle.
Secure the sides with adhesive, creating a neat and secure envelope. Adding a decorative sticker or small ribbon to the flap completes the look.
Adding Festive Touches to Packaging
Small details can make a big difference in elevating your card packaging. A few simple additions can transform an ordinary package into a festive delight.
- Festive Ribbons and Twine: Tie a satin ribbon, a piece of rustic twine, or a glittery cord around your card or package. Choose colors that complement your card’s design.
- Personalized Stickers and Labels: Create or purchase custom stickers with a festive message or your name. These add a personal touch and seal the package securely.
- Small Festive Accents: Include small items like miniature ornaments, sprigs of holly, or even a small candy cane to enhance the festive atmosphere. These little extras show you’ve put extra thought and care into your gift.
Common Queries: Easy Diy Christmas Cards
What type of glue is best for card making?
A strong, acid-free adhesive like a glue stick or a precision glue pen works well for most card-making projects. Avoid using anything that might wrinkle or damage the paper.
How can I make my cards more environmentally friendly?
Use recycled paper, repurpose scrap materials, and choose eco-friendly embellishments. Consider using natural materials like twigs, leaves, or dried flowers.
Where can I find inspiration for unique card designs?
Browse online resources like Pinterest and Etsy, visit craft stores for ideas, or look at holiday magazines for inspiration. Consider your recipient’s interests when choosing a design.
Can I use watercolor paints on cardstock?
Yes, but use a heavier weight cardstock to prevent warping. Test your paints on a scrap piece of the same cardstock first.


